dairy-free homemade ice cream 

One of my all time favorite sweet treats is ice cream.  I can eat it year round.  However, my precious Little Mouse does not tolerate dairy, so traditional ice cream is difficult to consume without hearing her little voice asking why she can’t have any and shouting “it’s not fair!”  Yes, we have purchased dairy-free ice cream at the grocery store, and it’s not too bad, but it is super expensive!  We generally have various other dairy-free frozen treats on hand that we’ve really come to love – Italian ice, various popsicles, etc.  However, when I came across this recipe, I knew I had to try it.  I know there are tons of dairy-free ice cream recipes floating around, but I don’t have an ice cream maker (maybe one day), so I had to be creative.  This recipe is super simple, and the best part – I can’t believe I haven’t mentioned this yet – not only is it diary -free, it is sugar free and so healthy you could eat it for breakfast!!  All you need is three ingredients, that right, just 3!!

img_9897

Dairy-free Homemade Ice Cream

  • Ripe Bananas (3-4)
  • Frozen Blueberries (about 2 cups)
  • Unsweetened Original Almond Milk (or other dairy-free alternative)

Line a cookie sheet with parchment paper.  Peel and slice bananas into 1 inch segments and spread them in a single layer on the cookie sheet.  Freeze for about 30 minutes.

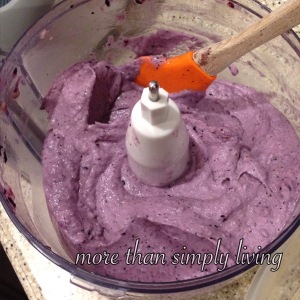
After bananas are frozen, peel them off the parchment paper and place them into a food processor.  Add the frozen blueberries and a splash of almond milk.  Blend on high until smooth.  I had to scrape the sides occasionally and add a little almond milk as I went to get the consistency I wanted.  It should be very smooth and creamy.
img_9898

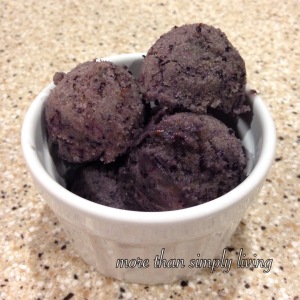
You can serve it right away, or transfer it to an air tight container and store in the the freezer.  We enjoyed some right then (comparable to soft-serve ice cream), and then saved the rest (more comparable to hard ice cream).  Little Mouse was amendment that this was not ice cream, but rather Blueberry Delight!  It has definitely been a big hit with everyone at our house.  And my favorite thing about it is that I can say “YES!!” to this anytime Little Mouse requests some since it is just fruit, and there is no additional sugar added – super healthy treat!!

I’m looking forward to making some more – maybe next time I’ll use strawberries or even some mango rather than blueberries.

Do you have a favorite frozen dairy-free treat? I would love to hear about it.

Posted in Dairy-free, Dessert, Recipes, Snacks, Uncategorized | Tagged , , , , , , , , , , , , , , | Leave a comment

Gluten-free Italian Herb Muffins

We are taking a break from gluten for the next 4 weeks, and I’ve been challenged once again to think outside my comfort zone when it comes to baking breads.  This time, we were having one of our favorite crock pot dishes – Bean and Kale Soup.  We generally accompany this soup with some fantastic green-chili cornbread or some really simple Italian Herb Muffins.  I decided to change up my recipe for the Italian Herb Muffins and make a gluten-free version.  These are also dairy-free, but regular milk can easily be substituted.

img_9741

Gluten-free Italian Herb Muffins

  • 2 cups Gluten-free all-purpose flour
  • 1/2 teaspoon xanthan gum
  • 1 Tablespoon sugar
  • 1 Tablespoon Italian Seasoning
  • 1 teaspoon garlic powder
  • 3 teaspoons baking powder
  • 1 teaspoon salt
  • 1 egg
  • 1 cup almond milk
  • 1/4 cup vegetable oil

NOTE:  If the gluten free all-purpose flour you are using is already a blend containing xanthan gum, there is no need to add more.  The blend I used did not have any already added.

Preheat oven to 400 degrees.

In a bowl, combine all dry ingredients – GF flour, xanthan gum, sugar, Italian seasoning, baking powder, salt, and garlic.  Stir until well blended.  Add in the wet ingredients – egg, milk, and oil.  Stir until everything is combined and there are no dry lumps in the batter.

Spoon evenly into a greased cupcake tin.  (Makes 12 muffins) Bake at 400 degrees for 15-20 minutes or until a toothpick comes out clean.  Cool for 5 minutes before removing from pan.

Other than a slightly difference in taste (between the wheat flour and GF flour), I didn’t notice much difference in these muffins from the non-Gluten-free version.  They were still light and flaky and almost a cross between a muffin and a biscuit in texture.  They definitely paired well with the soup we had!! I would love to know how your favorite gluten-free biscuit compares with these!!

img_9739

Posted in Breads, Dairy-free, Gluten-free, Recipes, Uncategorized | Tagged , , , , , , , , , , , , , , | Leave a comment

Healthy chocolate coconut bars

Let me first say, these bars are AMAZING.  Truth be told… I. LOVE. DESSERT.  There, I said it.  I guess it’s not a big shock, being that my favorite hobby it to bake and decorate cakes.  But, there is a constant war going on inside of me.  One side that loves all things sweet – cake, icing, pies, cookies, brownies…, and the other desiring to be healthy and knowing that really none of these things are good for our overall health.  Don’t get me wrong, I really don’t think there is anything wrong with an occasional cake to celebrate a special occasion or making cookies with my Little Mouse and creating memories together in the kitchen, but as a whole it’s not something we need to consume on a regular basis.

Last week this battle was once again going on inside me when I was making a cake for a friend, and really wanting to have some for  myself too.  I had also been craving some “Healthy Chocolate Bars” that my mom made when we were growing up.  I didn’t any of the main ingredients on hand, so I decided to alter it a bit to make it even healthier than the original.  The end result was far better than the original every was!  YAY!!  I LOVE it when my ideas actually turn out and are delicious!!

These bars are not only healthy, they are also dairy free and gluten free, and very low in sugar.  I used coconut palm sugar as the sweetener because this sugar is not refined near as much as others and actually ranks as one of the lowest on the glycemic index chart – meaning it does not spike your blood sugar resulting in surges of insulin in the body, rather your body digests it much more slowly.

img_9731

Healthy Chocolate Coconut Bars

  • 1/2 cup coconut oil – melted
  • 1/2 cup coconut palm sugar
  • 1 teaspoon vanilla extract
  • 1 egg
  • 1 cup oatmeal – ground fine in a food processor
  • 2 cups almond meal
  • 1/2 cup unsweetened shredded coconut
  • 1/8 cup almond milk
  • 1 cup dark chocolate chips

Preheat oven to 325 degrees.

In a mixing bowl, stir together all the ingredients except for the chocolate chips.  This should be very thick.  Pat evenly into the bottom of a 9 inch x 13 inch baking dish.  Bake at 325 degrees for 20-25 minutes.  It should be golden brown and no longer look wet.

After removing from the oven immediately sprinkle chocolate chips over the top of the bars (this will cause the chocolate to melt).  After setting for a few minutes, spread the melted chocolate chips like icing to cover the top of the bars.

Once cooled completely, the chocolate will firm back up.  You may need to put it in the fridge for an hour or so.  Once the chocolate has hardened, cut the bars and store in an airtight container.

These are so good!  They are also quite a filling snack with all the almond meal and oatmeal in them.  They are just perfect, just a tad sweet, and the coconut really sets them off.  Now I have a healthy go-to recipe for when I get those chocolate cravings!  I would love to know your favorite HEALTHY dessert!

Posted in Dairy-free, Dessert, Gluten-free, Recipes, Snacks, Uncategorized | Tagged , , , , , , , , , , , , , | 2 Comments

Kimchi

My husband and I love the show “M.A.S.H”.  In fact, we recently finished the entire series.  We had been slowly watching all the episodes on Neflix over the past year or so.  It was on this show that I first heard about Kimchi (I know, I’m so cultured. LOL!)  What I didn’t realize was that is similar to Sour Kraut – something I’m very familiar with – having some German ancestry in my family.  However, I’ve never actually made my own Sour Kraut let alone my own Kimchi.  My friend Brigett over at 2 Herb It Up gave a tutorial on Periscope not too long ago on how to make your own Sour Kraut and Kimchi at home.  Not only did I learn what the process entailed, but I also learned the nutritional value of eating these foods.  According to what Brigett said, these fermented foods provide an excellent source of natural probiotics – what our bodies need to aid in good digestion and overall good gut health.  What I was very surprised to learn was how easy the process is to make these fermented foods!  If you know me well, you know I’m all about simple, easy, and healthy foods, so I knew I had to give it a try.  Being that I had never had Kimchi before, I decided to try to make it rather than Sour Kraut this time around.  Here is what you’ll need.

Kimchi

1/2 head of cabbage – shredded

1 cup carrots – chopped or shredded

1/2 cup green onion – finely chopped

2-3 cloves garlic – minced or pressed.  You can adjust the amount to your taste.

1 Tablespoon fresh ginger – grated or finely minced

1/4 teaspoon crushed red pepper – more or less depending on your preference

1 – 1 1/2 Tablespoon sea salt

img_9511

I first gathered and prepared all of my ingredients so I knew I would leave anything out.  The next step is to fill a glass jar with the cabbage and begin pounding it with some sort of mallet.  I have a large smooth rolling pin without handles, so I used this to pound the cabbage.  You’ll want to gently pound the cabbage until all the juices run and the cabbage is setting in the juice (about 10 minutes).  Add in the remaining ingredients – carrots, green onion, garlic, ginger, crushed red pepper, and salt.  Continue to gently pound your veggies for another few minutes so the juices from the carrots and onions are pressed as well.  Soon you’ll find all your veggies soaking in liquid.  If they are not covered in liquid, you’ll want to add some filtered water until everything is completely submerged.  Use a cabbage leaf or two from the remaining half of your cabbage and cover the top of your Kimchi.  I then used a smaller jar, setting it on top of the cabbage leaves to hold everything down in the liquid.

The Kimchi needs to breath while it ferments, so I covered the top of my jar with a coffee filter and secured it with a rubber band.

img_9517

And the work is finished!  All you do now, is leave it setting on your counter for a few days – just be sure you don’t forget about it.  I will admit, it was hard to forget about it after the second full day on the counter.  We woke to this “smell” permeating the house and could NOT figure out what it was.  Turns out it was the Kimch, Lol!  Day 3 proved to be a much less smelly day, and by day 5 we couldn’t smell it at all.  Thank goodness!!

After a few days on the counter you’ll want to begin tasting your Kimchi to see if it is ready to store in the fridge.  According to Brigett, the fermenting process may only take 3 days in the warmer months, but a few more in the colder months.  After testing on Day 3, I decided to let it set a while longer.  To be honest, I was too busy on Day 4, so I didn’t have a chance to test it.  On Day 5, I thought it was tasting pretty good.  It had a nice sour taste, a slight crunch from the cabbage, and the flavors were melded together quite nicely.

After removing the cabbage leaves from the top, I stirred all the veggies to loosen what was on the bottom and added just a touch more water to keep everything covered.  I replaced the coffee filter with a regular lid and the Kimchi is now in our fridge.

Even if we don’t eat a lot of it in one sitting, I’m hoping we’ll remember to eat even just one or two bites of it each day.  Our bodies can definitely use the probiotics!

If you want to learn more about natural health, be sure to check out my friend, Brigett’s blog over at 2 Herb It Up!

I would love to know your experiences if you’ve ever made Kimchi or Sour Kraut!


Posted in Recipes, Uncategorized | Tagged , , , , , , , , , | 4 Comments

super easy crockpot meatballs and spaghetti

It has been years, I mean YEARS – like way back when I was living with my parents years, since I made meatballs.  At least,… until now.  I never enjoyed any of the process – hand mixing meat, eggs, seasoning, cooking them in a pan until you hoped they were cooked through, yet trying your best not to burn them.  At the same time, the simplicity of just buying premade meatballs goes against my desire to eat minimally processed foods (not really sure what’s all in those meatballs anyway).  This week, I came across this recipe in a cookbook I bought not too long ago.  It sounded easy enough, and since my Little Mouse loves meatballs dearly, I thought I’d give it a go.  A big plus – its made in a crockpot!

img_9518

Super Easy Meatballs and Spaghetti

  • 2 lbs Italian Sausage (our favorite is Johnsonville Sweet Italian Sausage – has amazing flavor and definitely not too spicy for my Little Mouse)
  • 28 oz crushed tomatoes
  • 2 (14.5 oz) cans petite diced tomatoes
  • 1 Tablespoon Italian seasoning
  • 1 teaspoon garlic powder
  • 1 teaspoon onion powder
  • 1/4 teaspoon black pepper
  • 2 teaspoons sugar
  • salt to taste

Remove casing from sausage and brake into 1 inch pieces, shaping them into balls.  Drop into crockpot.  It’s okay if they are layered on top of each other.

In a separate bowl, stir together the crushed tomatoes, petite diced tomatoes, Italian seasoning, garlic powder, onion powder, pepper, sugar, and salt.

Poor over the meatballs in the crockpot.  Cook on low for 8 hours or on high for 5-6 hours.

Serve with your favorite noodles.  Little Mouse had hers over regular spaghetti noodles, while we opted to eat ours atop zucchini noodles (zucchini cut with a veggie noodle cutter thingy).

This was definitely a successful dish!  My family raved over it!  Little Mouse was so excited all day that I was actually making meatballs.  She even thanked God (again) for our meatball dinner during her bedtime prayers.

It was so easy, and super quick to put together, that I’m sure this will become a regular on our monthly menu!

I hope you give it a try and be sure to let me know how your family likes it!

Posted in Dairy-free, Gluten-free, Recipes, Uncategorized | Tagged , , , , , , , , , , , , , , , | 3 Comments

DIY Magnets

I don’t know why good magnets are hard to find and expensive when you do find them.  Recently I was at my sister’s house and commented on some of her pretty magnets.  I was surprised to hear that she and her kids made them!  Why had I never thought about that before?!?!? I am all about easy crafts that are inexpensive and practical.

IMG_9071

Here is what you’ll need:

  1.  Bag of glass gems – those half marble decoration pieces.  I found some 1 inch ones at the dollar store which were the perfect size. Just make sure they are clear so you can see the paper through them.
  2. Pretty paper – I used different printed scrap-booking paper
  3. Strong magnets
  4. Mod podge
  5. Hot glue gun
  6. Scissors
  7. Pencil

On the back of the paper, trace the half marbles with a pencil.  Cut each circle out.  I did this for a few and then decided to just cut small squares of paper and then on the print side line the marble over the section of paper I wanted to show through on the magnet.  While holding the marble in place, you can cut the paper around it to the desired size.  NOTE:  cutting the paper this way makes it more challenging for younger kids.  Little Mouse lost interest in cutting really quickly.

Next, paint some Mod podge on the flat side of the marble.  Place the paper, print side down on top of the glue.  Continue until you have glued paper onto each marble.   Little Mouse loved helping with this part!

After the glue dries, hot glue one magnet onto the paper side of the marble.  Once the glue cools, your magnets are complete.  We made close to 100 magnets in less than an hour!

You can enjoy them all to your self, or give them away as gifts.  We kept some and have used others as Christmas gifts for teachers – who doesn’t need more magnets?!  I love to give home made gifts to teachers, especially when Little Mouse has had a part in making them.  Even after assembling the gifts, we now have plenty of  magnets on our fridge!!

IMG_9081


Posted in crafts, For the Home, Holiday, Joys of Parenthood, Uncategorized | Tagged , , , , , , | 2 Comments

Christmas through the eyes of a 6 year-old

IMG_9057

So far, the days leading up to the Christmas holiday have been filled with excitement, and also a few challenges.  Little Mouse is now 6 and she is filled with such excitement that it’s hard to not be in the mood for all the festivities.  If she had had her way, we would have put out all the decorations back in October.  In fact, she has been listening to a Kids Christmas music station on Pandora at least since then.

We pulled out the decorations a few days after Thanksgiving and began to make our home reflect our heart’s celebration of the Christmas season.  The excitement that Little Mouse shared as she told of the memories of Christmas’s past with each ornament pulled from the box and hung it on the tree brought memories flooding back to my mind of Christmas when I was a child.  The memories each ornament brings to mind fills our hearts with warmth, but also brought the realization that there were Christmas’s “before she were born”, bringing feelings of having missed out on some special moments in years past.

We have already watched several of the classic Christmas movies (Little Mouse’s first time for all of them) – Rudolf the Red Nosed Reindeer, The Story of Santa Clause, Frosty the Snowman, Charlie Brown’s Christmas, etc.  She has been enthralled with each one.

As far as Santa Clause goes, Little Mouse knows the truth.  We’ve never played Santa, choosing instead for her to know that the gifts she receives come from people who know and love her unconditionally.  The whole challenge of gift giving at Christmas really hasn’t been existent until now.  She is definitely more aware of things around her that entice desire, selfishness, and greed.  It seems as though Christmas these days brings a whole lot of greed into each person.  This year has been no exception for our little 6 year-old.  Marketing has really done it’s job lately!  The toy magazines that magically show up in the mailbox this time of year, the huge displays of toys as soon as you walk into a store, and commercials (which we rarely see) planting in our minds that if we only get “this thing” we’ll be happy.

This is the first year that Little Mouse has mentioned making a Christmas list and having enormously high expectations of things she wants.  It has been quite the shock to us as parents.  Up until this point, we haven’t experienced this.  How we manages 6 full years of no “list” and “want, want, want” attitudes I don’t really know – other than the fact that we now have cable and she reads everything she sees, literally!!

How were we going to handle this?  It definitely had to be ‘nipped in the bud’ so to speak.  Over lunch one day, after receiving the American Girl magazine (thank you very much AG) and hearing of all the doll things she now “has wanted her whole life”, we did our best to bring her back to reality.  We talked about the cost of “name brand” and compared it to other alternatives.  We talked about there being tons of things we may want, and the reality of things that we truly need.  We talked about being grateful for all the things that we have already been blessed with.  And, we talked about the reason we give gifts at Christmas.

We wanted it to be clear that we don’t give her gifts because she WANTS them, instead we give her gifts because we LOVE her.  We told her she is welcome to make a list of things she wants, but there is a chance that she may not get anything on that list.  Our purpose in giving her gifts is not to fulfill her expectations, but rather to bless her with gifts because we love her.  We told her that there are things that we have in mind to give her that aren’t even on her ‘list’, but we know they are things that she will love and use for a long time.

So, rather than making a list of things she wants, we encouraged her to think of things she can give to others or things she can do for others that will show God’s love.  Because that is what Christmas is all about, not about what gifts are under the tree, but the greatest gift ever given – Jesus Christ, God’s Son.  God has shown us such great love by giving us eternal life through Jesus Christ.  That’s what Christmas is all about – sharing God’s love with others.  I wont get off on the tangent of needing to do this all year long and not just the month of December.  Truly, we talk of sharing God’s love to others every day in our home – that’s our whole purpose in being here on this earth, to bring God glory by sharing His love with those around us.  But, because the majority of the world celebrates Christmas and sees it as a time of wanting and getting, it is of utmost importance that we strive to share God’s love especially now.  As Christians we say we celebrate Christmas as Jesus’ birthday, and that is what we are truly celebrating, but what do our actions say?  Are we too filled with selfishness and greed? Are we so caught up in the going and doing and shopping that we miss the opportunities to share God’s love with those we pass by?

I don’t write this to begrudge anyone’s traditions, but rather to challenge myself to keep Christ at the center of my celebration, and to guard my child’s heart from being distracted from the true meaning of Christmas.  I know this is a process that we will work through on any given day and each year we will visit the challenges and blessings the Christmas season brings.  But for now, our Little Mouse seems to be “getting it” at least for today.  

Posted in Homeschool, Joys of Parenthood, Lessons in Life, Uncategorized | Tagged , , , , , | Leave a comment

We’re not left to sink

Our lesson in Bible class the other day was on how God’s children can trust Him.  The story was from Matthew 14:22-33. I challenge you to read it to refresh your memory, or to read it for the first time.  It truly is an amazing story!  I’ll give a little synopses to set the scene.  This is the story of the disciples being out on the stormy sea.  In the middle of the storm they see a white figure coming toward them.  Upon learning that it is Jesus walking toward them in the middle of the sea, Peter (who always seems to open his mouth without thinking – or, as I’ve started to see it has the trusting faith of a child) calls out to Jesus and says, “Jesus, if that’s really you, call me to come and walk out there with you.”  Possibly to Peter’s surprise, Jesus says, “Come!”  Peter, fully trusting Jesus, steps out of the boat and walks on the water.  That is, until he is distracted by the storming sea all around him and begins to sink.  Jesus then takes Peter by the hand, lifts him out of the water and they return to the boat.
There are SO many amazing lessons to gather from this incredible story.  A couple years ago, I heard it in a way that left me challenged in this way.  Sometimes we see God moving and working in incredible ways (Jesus walking on the water) and we so desperately want to join Him (Peter asking to walk on the water with Jesus).  God’s answer to us is “Absolutely!  Come join me!  All it takes is a willing and trusting heart.”  We are then left with a choice – Am I going to step out of the boat and join Jesus on the water as Peter did, or am I going to stay in the boat with everyone else (the remaining disciples) and just stand by watching?  I want to step out of the boat and join in the incredible work God is doing!

That’s not the end of the story though.  Yes, Peter stepped out and joined Jesus on the water, but then he was distracted.  Faith is not always easy.  When we are joining in God’s plan and purpose, challenges WILL come.  We will be distracted by so many things – loss, hurt, heartache, even the craziness of life, or the mundane tasks of each day.  Our eyes and heart will be diverted from Christ and His purpose, to the storms that rage around us.  We may feel ourselves sinking into discouragement and despair just as Peter sank into the sea.

There is HOPE!  Matthew 14:31 says, “Immediately Jesus stretched out His hand and caught him…”  We are not left alone to figure it out ourselves!  Peter was not left to sink because he failed in his faith.  Peter was human, Jesus was not.  I am human, I will make mistakes, I will fail.  BUT, when I do, Jesus is there to catch me.  He doesn’t leave me to sink!

Verse 31 continues with Jesus’ comment to Peter, “…Oh you of little faith, why did you doubt?”  I used to be stumped by this question, but now know that Jesus was not condemning Peter’s lapse of faith.  Rather, I see it now as something a parent might say to a child that didn’t follow their direction for safety.  As a mother, I first run to my child and help them up, assure them of my love, and then correct them lovingly so they learn from the experience.  Jesus came immediately to Peter’s aid and only after he was in His protective arms did Jesus correct Peter, to show him that he still had need of Jesus.  Jesus’ statement is filled with encouragement for Peter to trust Him no matter what is going on around him.

The phrase that hit home to me today is found in verse 32.  It says, “And when they got into the boat….”  There is no indication that they swam back to the boat and were pulled in by the remaining disciples.  I believe that when Jesus pulled Peter up out of the water, they WALKED back to the boat together.  You see, Jesus didn’t call Peter out of the boat to walk alone.  He called him out of the boat to walk beside Him.  Even after Peter’s fail, Jesus didn’t leave him out there to sink.  He pulled him out of the water and they walked together, side by side.  Wow!  When God calls us out of the boat (our comfort zone) to walk on water (be part of His bigger plan – no matter how impossible it may seem), He doesn’t make us do it alone and then condemn us when we fail.  Instead, He walks beside us every step of the way, picks us up when we do fail (because we will), and teaches us to trust Him more.  He is there to walk beside us, and never leaves us to sink.

I am so thankful that I’m not alone on this journey.  I’m amazed that despite my shortcomings and failures, God calls me to take part in His amazing plan, and is there to pull me up and walk with me the entire way.

Friend, He is there to do the same for you.  He loves us (all of us, even you) with an amazing and everlasting love.  We only need to trust Him!


Posted in Homeschool, Joys of Parenthood, Lessons in Life, Uncategorized | Tagged , , , , , | Leave a comment

Turkey Bacon

Turkey Bacon

This Thanksgiving dinner brought a whole new meaning to the term “turkey bacon”.  Oh. My. Word.

Let me back up a minute.  First of all, I was not looking forward to turkey this year.  To be honest, most of the time it ends up dry and not very tasty, and I am over it after just one slice.  My husband will vouch for this, because I commented several times leading up to the holiday about thinking outside the box and not doing a turkey at all.  In fact, the only reason I even agreed to do a turkey is because we hosted my husband’s family the dinner this year, and he and my daughter were really looking forward to the turkey.  After much pleading and begging on their parts, I gave in and bought a turkey.

Remembering back to the last time we hosted (several years ago), when the turkey turned out pretty decent, I scrounged and found the brine that I soaked the bird in that year.  Side note here – if you have never brined a turkey…. DO IT!!!!!!  It is worth the effort! I’ll provide the recipe I used below, but when you brine, you make a salt mixture and soak the turkey in it for 24 hours prior to baking.  This tenderizes the meat and makes it so moist!  Definitely the way to go in my opinion!!

Using the brine was the only thing on my radar until my Father-in-law showed up.  One thing you need to know about Pops is that he is an amazing cook!  When he walks in the kitchen and starts cooking, you just stand back and drool.  He came telling of an idea he saw of making a bacon weave to go on the turkey as it bakes.  Me, not really excited about the turkey, agreed right away because let’s face it…. bacon makes everything better!

Once again, bacon did not fail!  The turkey this year was absolutely amazing!  The brine made the turkey so moist, and the bacon provided such incredible flavor.  It was definitely worth it!! And, for once, I have enjoyed eating the leftovers.  🙂

Turkey Brine

1 cup kosher salt

1 cup light brown sugar

1 teaspoon cracked pepper

3-4 garlic cloves minced

2 Tablespoons Worcestershire sauce

1 quart warm water

Mix the kosher salt and brown sugar in the warm water until completely dissolved.  Stir in pepper, garlic, and Worcestershire sauce.  After rinsing a thawed turkey, place the turkey in a large container and poor water mixture over turkey.  Add additional water until the turkey is completely covered.  Allow to soak for 24 hours.  Rinse turkey before baking.

Bacon Weave

1 lb of your favorite thick cut bacon

Weave just like you would imagine if you were weaving a basket.  It will look something like this.

While you’re preparing the turkey to put in the oven, place your bacon weave into the freezer (about 15 minutes).  When ready, drape over the turkey breast.  Bake according to the baking chart for your size turkey.

As I’ve already said, the end result is absolutely amazing!

IMG_8934

We baked our turkey in a bag so it didn’t require any basting.  The bacon added so much to the flavor of the turkey and definitely brings a while new meaning to the term “turkey bacon”!  Enjoy!!


Posted in Dairy-free, Gluten-free, Recipes, Uncategorized | Tagged , , , , , , , | 6 Comments

Chicken Fried Rice

Chicken Fried Rice

One of my new “go-to” meals has become Chicken Fried Rice.  It is so easy and very good.  It is probably one of the best “one-dish wonders” we’ve had in a while!  I love that I don’t have to use and then clean every pan I have in my kitchen.  LOL!

Chicken Fried Rice

  • 1 boneless, skinless chicken breast – cut into small cubes
  • 1 bag frozen mixed vegetables
  • 1 small onion, diced
  • 2 eggs
  • 2 cups rice, cooked
  • soy sauce for seasoning

In a large skillet, sauté chicken in 2 tablespoons olive oil until no longer pink.Chicken Fried Rice  Add the diced onion and sauté until tender.  Stir in the frozen vegetables and cover.  Allow to steam until vegetables are soft and heated through.

Scrape chicken and vegetables to one side of the pan and cook your eggs on the other side.  Once the eggs are cooked, stir together with the chicken/vegetable mixture.

Stir in the rice and cook until hot throughout.  Season with soy sauce to add moisture and flavor as it cooks.

We have had this as a meal just by itself, and we have also added egg rolls to it.  It is absolutely delicious!  I think it would also be great with shrimp!!  🙂

Chicken Fried Rice

Posted in Dairy-free, Recipes | Tagged , , , , , , , , , , , , | 2 Comments